ESXI虚拟机扩容/目录(添加新硬盘) |
您所在的位置:网站首页 › esxi 增加硬盘 › ESXI虚拟机扩容/目录(添加新硬盘) |
ESXI虚拟机扩容/目录(添加新硬盘)
|
[[442443]]
背景:
线上服务器,磁盘Linux的虚拟机根分区已经使用90%,触发了磁盘告警,再一顿操作删除后,勉勉强强回到了82%,现在需要对根目录进行扩容。 进入到EXSI管理平台,看到原来的sda磁盘只有30G【图一】,新添加一块100G 的新硬盘【图二】 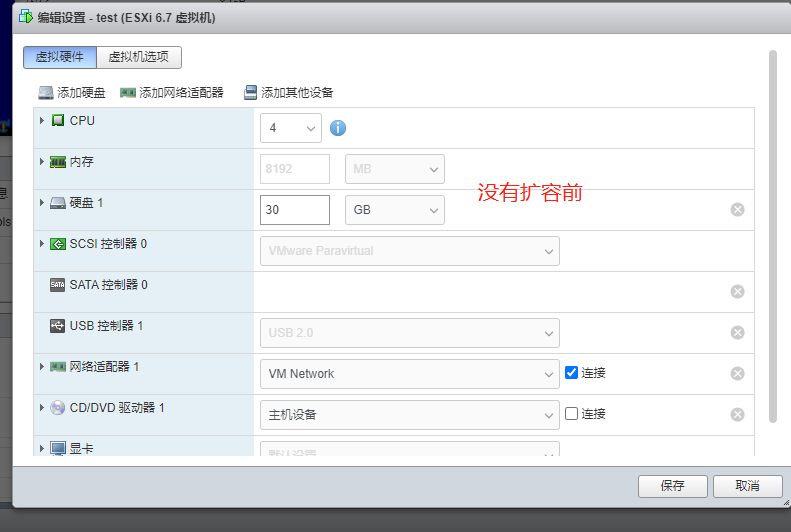
图一 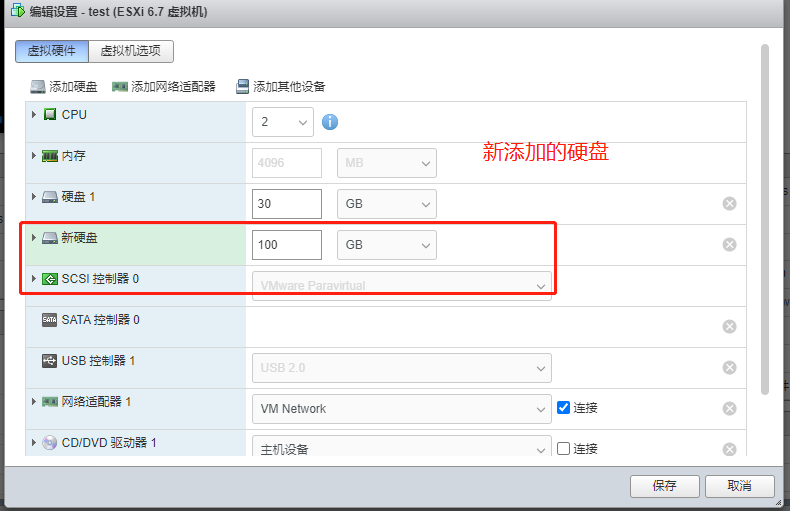
图二 登录机器,查看磁盘,发现了多了一块sdb [root@localhost ~]# lsblk NAME MAJ:MIN RM SIZE RO TYPE MOUNTPOINT sda 8:0 0 30G 0 disk ├─sda1 8:1 0 1G 0 part /boot └─sda2 8:2 0 29G 0 part ├─centos-root 253:0 0 26G 0 lvm / └─centos-swap 253:1 0 3G 0 lvm [SWAP] sdb 8:16 0 100G 0 disk sr0 11:0 1 1024M 0 rom 第一步:分区 [root@localhost ~]# fdisk /dev/sdb Welcome to fdisk (util-linux 2.23.2). Changes will remain in memory only, until you decide to write them. Be careful before using the write command. Device does not contain a recognized partition table Building a new DOS disklabel with disk identifier 0x3cb140d1. Command (m for help): n Partition type: p primary (0 primary, 0 extended, 4 free) e extended Select (default p): p Partition number (1-4, default 1): 1 First sector (2048-209715199, default 2048): Using default value 2048 Last sector, +sectors or +size{K,M,G} (2048-209715199, default 209715199): Using default value 209715199 Partition 1 of type Linux and of size 100 GiB is set Command (m for help): w The partition table has been altered! Calling ioctl() to re-read partition table. Syncing disks.再次查看磁盘,发现多了个sdb1 [root@localhost ~]# lsblk NAME MAJ:MIN RM SIZE RO TYPE MOUNTPOINT sda 8:0 0 30G 0 disk ├─sda1 8:1 0 1G 0 part /boot └─sda2 8:2 0 29G 0 part ├─centos-root 253:0 0 26G 0 lvm / └─centos-swap 253:1 0 3G 0 lvm [SWAP] sdb 8:16 0 100G 0 disk └─sdb1 8:17 0 100G 0 part sr0 11:0 1 1024M 0 rom 第二步:格式化格式化硬盘,这里使用xfs格式,建议使用和系统一样的文件格式 可以看到/分区 【/dev/mapper/centos-root】 使用的是xfs 的文件系统 [root@localhost ~]# blkid /dev/sda1: UUID="e1e8eda5-8b7a-45f0-a763-8868777e3f5f" TYPE="xfs" /dev/sda2: UUID="DQGZrB-2WRU-JneT-xKKw-WFSN-ozM9-rnW0S4" TYPE="LVM2_member" /dev/mapper/centos-root: UUID="a8e67b40-8e6e-4010-a911-21b4f95b90bf" TYPE="xfs" /dev/mapper/centos-swap: UUID="326cb3bd-ea93-460d-9f2b-cded2d3836c8" TYPE="swap"把/dev/sdb1 格式化成 xfs文件系统 [root@localhost ~]# mkfs.xfs /dev/sdb1 meta-data=/dev/sdb1 isize=512 agcount=4, agsize=6553536 blks = sectsz=512 attr=2, projid32bit=1 = crc=1 finobt=0, sparse=0 data = bsize=4096 blocks=26214144, imaxpct=25 = sunit=0 swidth=0 blks naming =version 2 bsize=4096 ascii-ci=0 ftype=1 log =internal log bsize=4096 blocks=12799, version=2 = sectsz=512 sunit=0 blks, lazy-count=1 realtime =none extsz=4096 blocks=0, rtextents=0可以看到/dev/sdb1 的文件系统为 xfs [root@localhost ~]# blkid /dev/sda1: UUID="e1e8eda5-8b7a-45f0-a763-8868777e3f5f" TYPE="xfs" /dev/sda2: UUID="DQGZrB-2WRU-JneT-xKKw-WFSN-ozM9-rnW0S4" TYPE="LVM2_member" /dev/mapper/centos-root: UUID="a8e67b40-8e6e-4010-a911-21b4f95b90bf" TYPE="xfs" /dev/mapper/centos-swap: UUID="326cb3bd-ea93-460d-9f2b-cded2d3836c8" TYPE="swap" /dev/sdb1: UUID="2eca6693-8885-4efe-a09e-320a0fe4eefa" TYPE="xfs" 第三步:lvm扩容通过lvdisplay 可以看到 / 分区 的lv 名称为 root [root@localhost ~]# lvdisplay .............. --- Logical volume --- LV Path /dev/centos/root LV Name root VG Name centos LV UUID upKlP7-AbiZ-e3Yh-aYYN-5Eel-ULsG-TVXVer LV Write Access read/write LV Creation host, time localhost, 2021-09-26 05:16:02 -0400 LV Status available # open 1 LV Size |
【本文地址】
今日新闻 |
推荐新闻 |